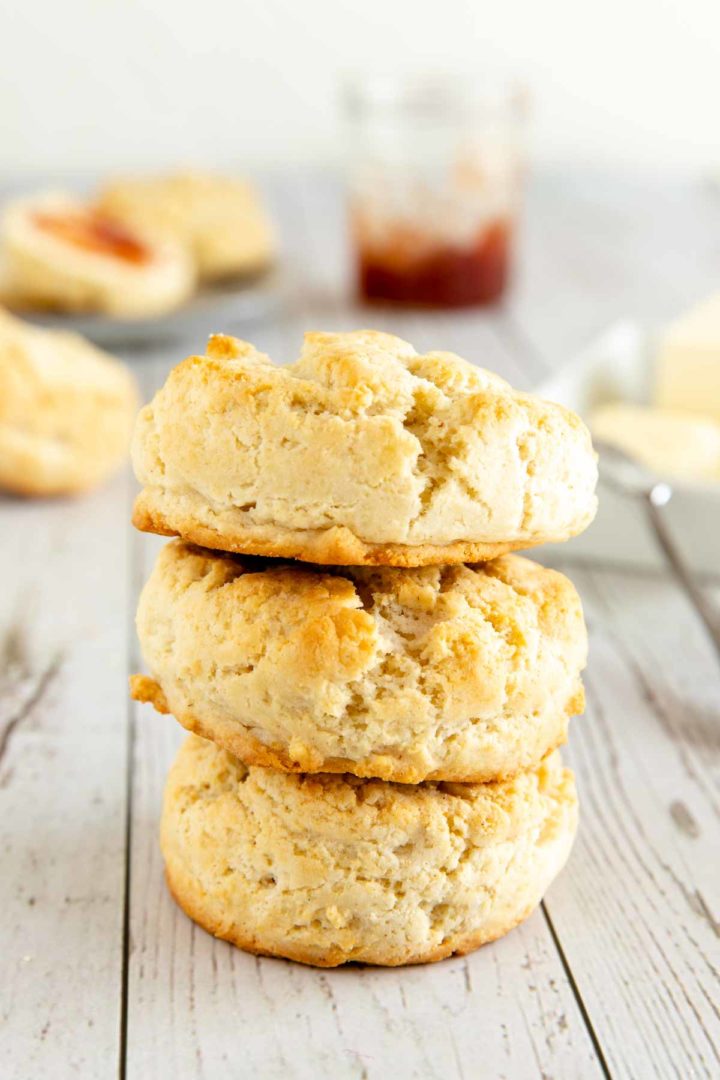
Gluten Free Baking Powder Biscuits
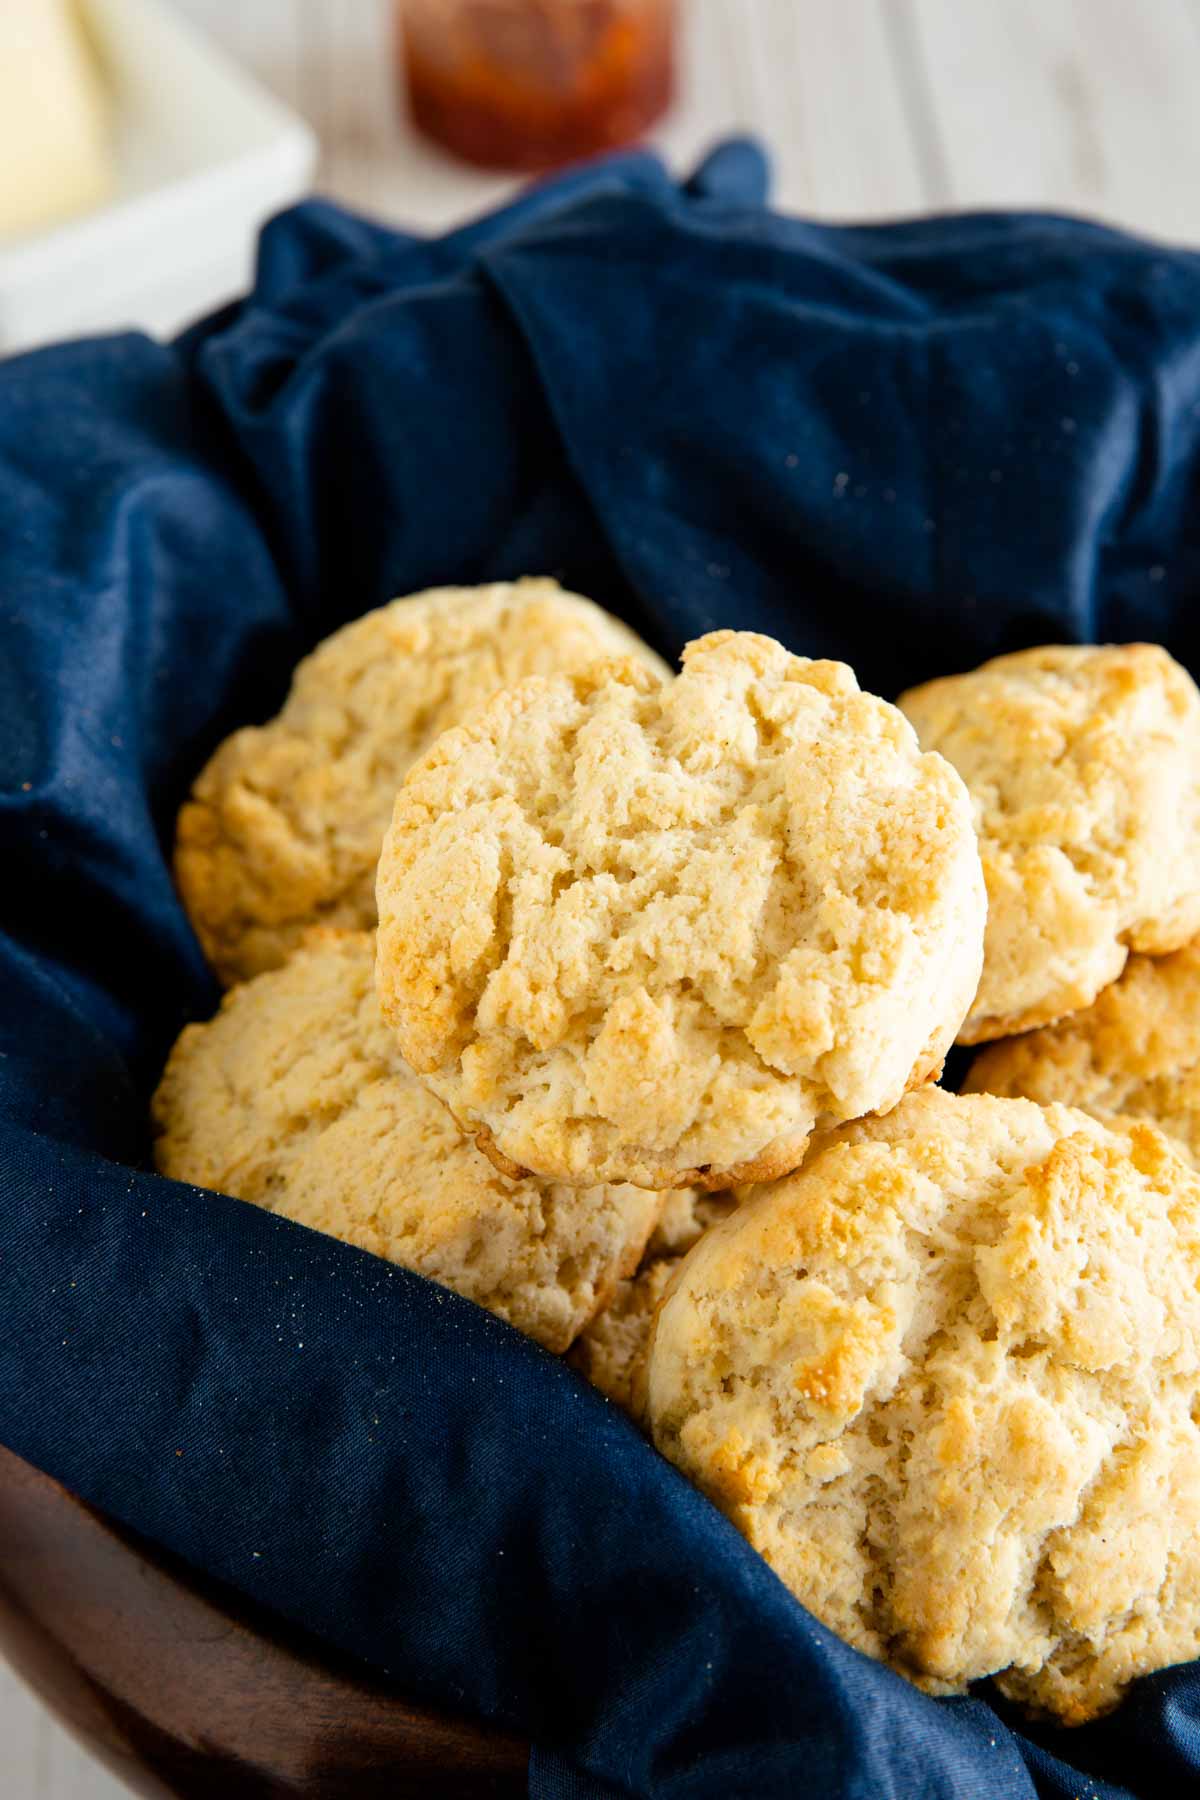
Gluten Free Baking Powder Biscuits are an easy mix, dump and stir recipe that will have hot fluffy biscuits on your table in less than 30 minutes!
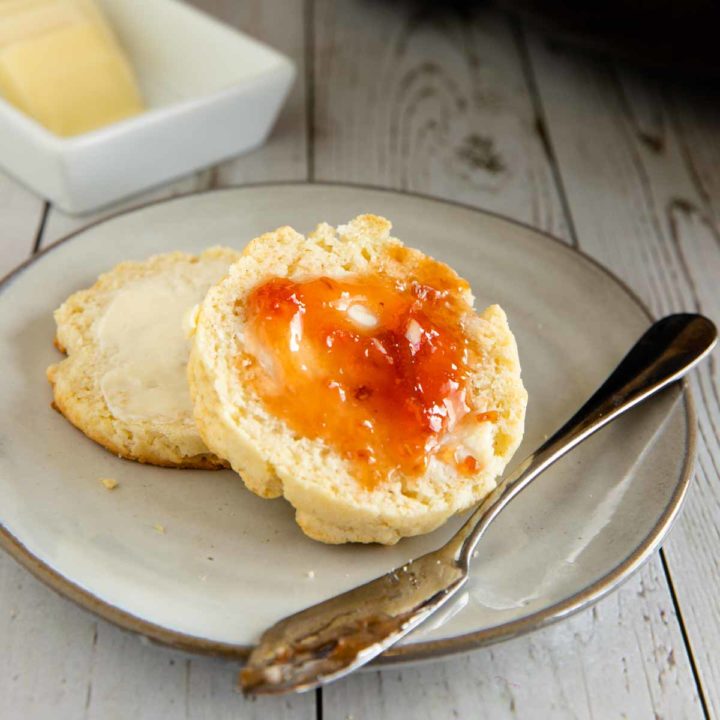
Everyone needs a good go-to biscuit recipe, and when you live a gluten free life-style a good gluten free biscuit recipe becomes even more valuable! This is my favorite recipe to pull out as a side dish with dinner or for weekend mornings with our favorite biscuits and gravy recipe, making it an all around favorite.
The best part of recipe developing is the little tweaks and tries that require making a recipe more than once to perfect it. Developing recipes for baked goods usually takes a few tries, but the results are worth it! As I’m writing this post, I am even thoroughly enjoying a hot fluffy biscuit with my afternoon coffee. I made the mistake of inadvertently emptying the memory card on my camera, so I needed to make a second batch to get some additional missing step photos for you guys…It was worth it!
Ingredient Notes:
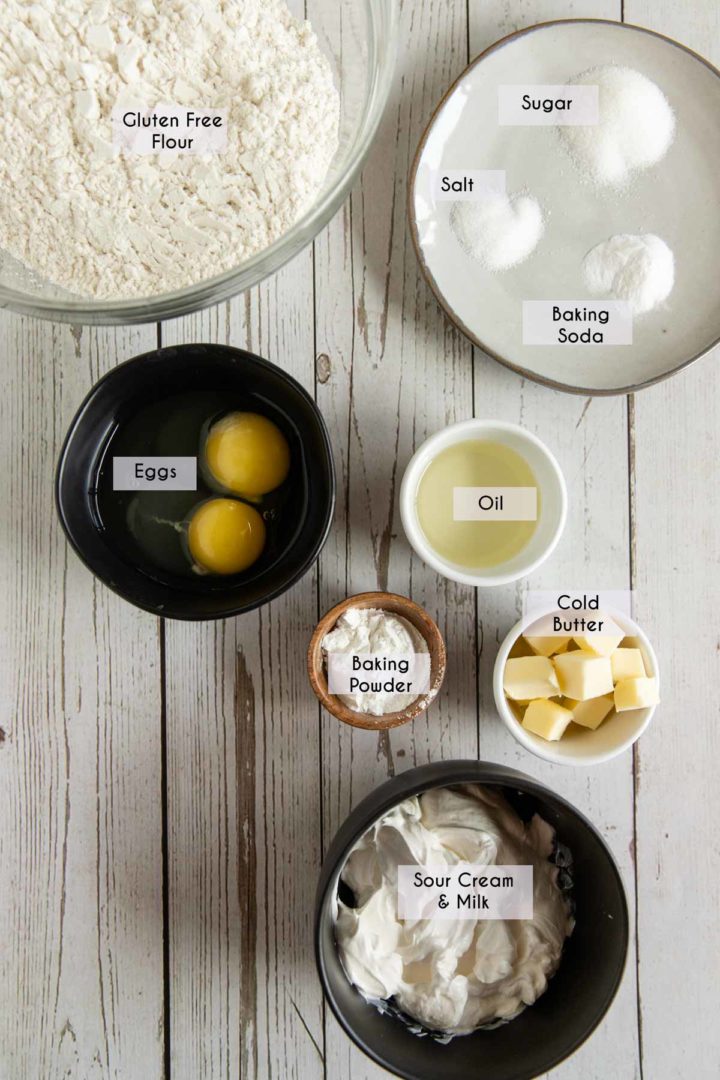
Which Gluten Free Flour to Use
I like to use rice based flours for most of my gluten free baking, and these baking powder biscuits are no different. The type I use is “Bob’s Red Mill 1 to 1 Baking Blend” which includes xanthan gum. I have consistently good results with this flour and have found it to work perfectly in helping to keep my biscuits and baked goods from being too dense and dry. If your blend does not include xanthan gum, then add ¼ teaspoon of xanthan to the blend you choose.
You can use a different brand of flour if you prefer, though I would recommend a rice based blend for similar results. Using a gluten free flour blend that is oat or chickpea based will yield entirely different results, but with some tweaking to the proportions, this recipe should make for a good base if using other types of flours.
With the difference between each brand, I have found that consistent measuring of gluten free flour can be challenging. Since going gluten free I have found a kitchen scale invaluable for baking and highly recommend weighing your flour. If you don’t have a kitchen scale, then the most consistent way of measuring is to fluff your flour up with a fork then gently scoop it into your measuring cup with a spoon. Lastly, level off the excess with the flat side of a knife to keep the flour in your measuring cup from packing down.
Leavening
To keep these gluten free biscuits fluffy, I find that a combination of baking powder and baking soda works best. Combine these with the eggs and they can’t help but rise!
The Best Fat For Biscuits
Gluten free biscuits don’t absorb fat the way using traditional flour would, so varying the types of fat and moisture content is very helpful in gluten free baking. This recipe splits up the fat by using butter for its rich flavor, but also using less butter and compensating with a light oil, like vegetable or canola oil, to still give it the fat content. Splitting the fat varieties this way keeps these biscuits light without sacrificing flavor.
Sour Cream
In an attempt to make these a gluten free buttermilk biscuit, I discovered that using straight up buttermilk for these biscuits left them dry and the gluten free flour didn’t absorb the milk as well. What worked like magic was to use sour cream instead of buttermilk. This added both an additional fat and leavening agent, as well as provided the perfect amount of moisture that the flour could handle. Using sour cream also kept that lovely “hint of tang” that buttermilk provides, making it the perfect substitute!
Step By Step
Making gluten free baking powder biscuits is surprisingly simple. No need to pull out a mixer. No big ol’ rolling pins and flour all over the counter to clean up. Just easy dump and mix biscuits that don’t even need rolling out making them the perfect gluten free drop biscuit!
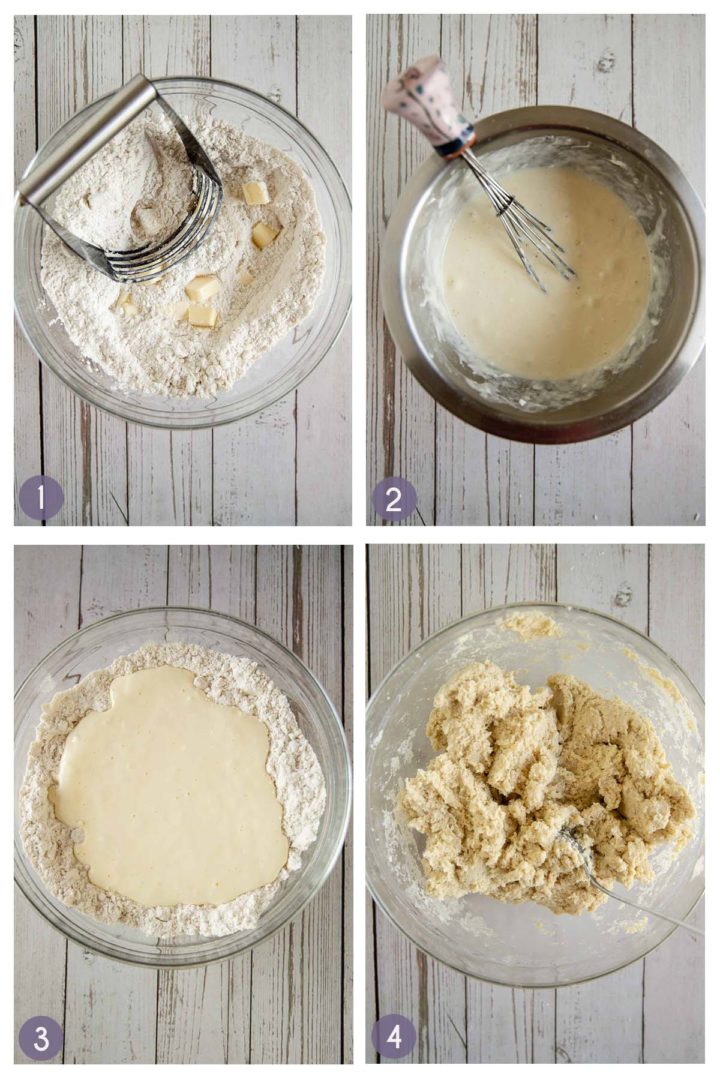
- Mix your dry ingredients,
- Using a fork or pastry blender, mix butter into dry ingredients
- Whisk together wet ingredients,
- Pour wet ingredients over flour mixture and stir to thoroughly combine!
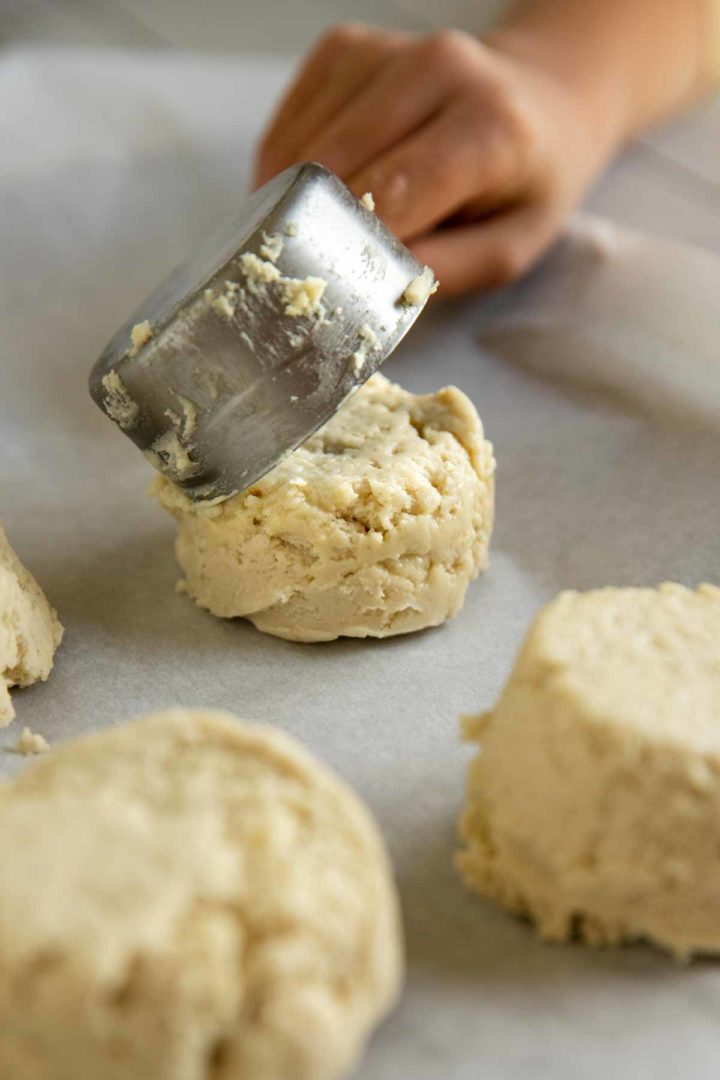
Shaping The Biscuits
- Preheat oven to 425° F
- Line a baking sheet with parchment
- Grease the inside of a ⅓ c measuring cup and gently scoop up the biscuit dough and form it into the measuring cup.
- Dump the dough out onto the baking sheet for the perfectly formed “no-roll” biscuit.
- Repeat with remaining biscuit dough, greasing the measuring cup as necessary.
- Bake for 15-17 minutes until the tops are just beginning to get golden brown spots.
- Let cool on a baking sheet for 5 minutes and enjoy!
Storage:
Like most gluten free baked goods, these baking powder biscuits are best eaten fresh. If you have leftovers, then they can be covered and stored at room temperature for up to 2 days. These biscuits re-heat easily in the microwave for just a few seconds. Gluten free biscuits tend to dry out faster than traditional biscuits so if they are starting to dry out then you can gently sprinkle a light misting of water onto the outside before re-warming them.
Freezing Biscuits:
These gluten free biscuits freeze absolutely wonderfully! Make the biscuits all the way up until the baking step, but don’t bake them. Once they have been formed into biscuits on a baking sheet, then pop the baking sheet into the freezer for a few hours until the biscuits have frozen solid. Once the biscuits are frozen then you can remove them from the baking sheet and put them in a resealable freezer bag to store for up to 1 month. Don’t thaw the biscuits before baking, but they will require a few additional minutes of cooking time.
If you want to freeze your biscuits after they are already cooked, then wrap each individual biscuit in plastic wrap and then place them in a resealable freezer bag to protect from any freezer burn. When ready to re-heat, lightly mist them with a little water and warm in the oven for 5-10 minutes until hot.
Trouble Shooting
1. Gluten free baking really is a science, and there are a number of factors that contribute to how biscuits rise. First off, which flour are you using? Each type of flour yields different results, for this recipe I use a rice based blend which includes xanthan gum
2. Check Your Leavening: Are you using both baking powder and baking soda in your biscuits? This combination works wonders in getting biscuits to rise.
3. Moisture content: If you have too much or too little liquid, then your biscuits will either not rise or be very dense. You want a sticky dough that holds its shape when pressed. Sour cream with just a bit of extra milk provides the perfect moisture for gluten free biscuits!
Need More Recipe Inspiration? Try These Reader Favorites:
Have You Tried This Recipe? It is very helpful to both me, and anyone else who wants to try this recipe, if you could go ahead and leave a star rating and any comments you have. Thank you!
Gluten Free Baking Powder Biscuits
Gluten Free Baking Powder Biscuits are an easy mix, dump and stir recipe that will have hot fluffy biscuits on your table in less than 30 minutes!
Ingredients
- 9 ounces (2 cups) Gluten Free Flour*
- 4 teaspoons Baking Powder
- 2 teaspoons Sugar
- 1/2 teaspoon Salt
- 1/4 teaspoon Baking Soda
- 3 Tablespoons Cold Butter, Cubed
- 1/2 Cup Sour Cream
- 2 Tablespoons Milk*
- 2 Eggs
- 2 Tablespoons Vegetable Oil
Instructions
- Preheat oven to 425° F and line a baking sheet with parchment. Set aside.
- In a large bowl, combine flour, baking powder, sugar, salt, and baking soda. Whisk to combine.
- Add the cold butter cubes to the flour mixture and use a pastry blender or your finger tips to crumble the butter into the flour until only small pea size chunks remain.
- In a medium bowl, whisk together the sour cream, milk, eggs and oil.
- Pour egg mixture over the flour mixture and stir very well to thoroughly combine, making sure no pockets of flour are left unmixed.
- If dough seems too dry then add just a little more milk, 1 Tablespoon at a time, and mix thoroughly until a soft scoop-able dough is formed, and all flour is mixed in.
- To shape the biscuits, use a 1/3 Cup dry measuring scoop and lightly grease the inside of it with oil or non-stick spray.
- Scoop up some biscuit dough with the measuring cup and gently pat it into the measuring cup.
- Dump the 1/3 cup of dough out onto your parchment lined baking sheet, creating a biscuit.
- Repeat with remaining dough, greasing the measuring cup as needed, spacing the biscuits just 1 1/2 -2" apart
- Bake for 15 minutes, rotating the pan half way through baking.
- If your baking sheet is made from a thin metal, then stack two baking sheets together to keep the bottom of your biscuits from browning too quickly.
- Let cool on the baking sheet for 5 minutes, then enjoy!
Notes
- I use "Bob's Red Mill 1 to 1 Baking Blend" for my flour. If you use a different brand, I recommend a rice based blend that includes xanthan gum. If your blend does not have xanthan gum, then add 1/4 teaspoon to your dry ingredients.
- If you do not have a kitchen scale for your flour, then first stir your flour with a fork to fluff it up, then gently scoop it into your measuring cup with a spoon. Lastly, use the the flat backside of a knife to scrape off any excess flour and level your measuring cup without packing it down.
- Different brands of flour may settle more. If you find your dough is too dry then add additional milk, 1 Tablespoon at a time, to thoroughly mix in all the flour.
- If you have the time, or find that your flour makes these to sandy in texture, then let your dough rest, covered with plastic wrap, for 30 minutes before shaping and baking the biscuits. This will help to absorb the the starches and keep from being a sandy texture.
Nutrition Information:
Yield:
6Serving Size:
1Amount Per Serving: Calories: 317Total Fat: 16gSaturated Fat: 7gTrans Fat: 1gUnsaturated Fat: 8gCholesterol: 89mgSodium: 633mgCarbohydrates: 36gFiber: 1gSugar: 2gProtein: 7g
*Nutrition information is automatically calculated and may not always be accurate.
Oh my goodness, these are good! Thank you for the recipe!
Glad you enjoyed them! They are a regular favorite in our house.
The best biscuit recipe . This will be my go to recipe. Thank you
This recipe is so versatile it’s definitely a favorite in our house. Glad you enjoyed them!
Oh my goodness these are fabulous !! Thank you I made them today . They are the best biscuit I’ve had in along time . Gluten free or otherwise !! 👍👍
So glad to hear! They are definitely in regular rotation at our house.