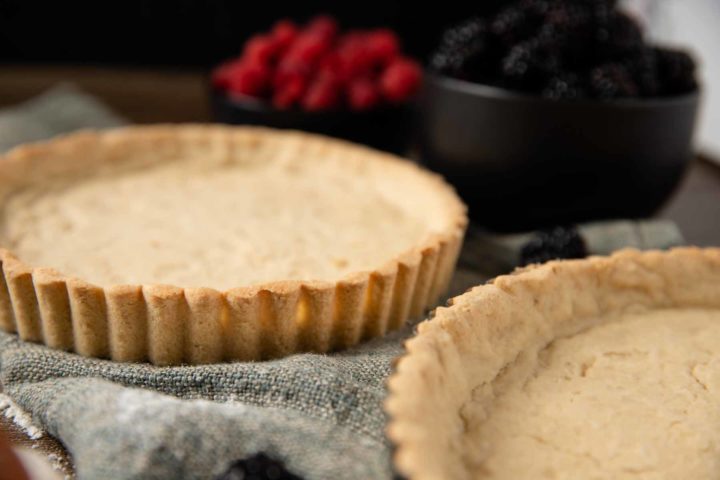
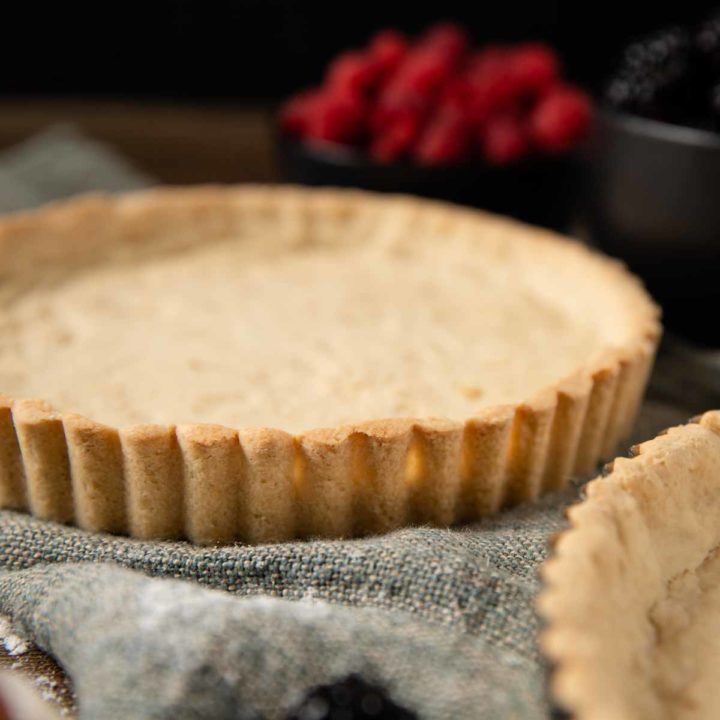
Gluten Free Tart Shell
This gluten free tart shell is the perfect way to class up any pie or tart recipe and make your dessert a showstopper in an effortless way! You can make the shell ahead of time to have ready when needed and the recipe includes both unbaked and pre-baked options to go with your dessert.
This gluten free tart shell is a Paté Sucrée tart crust which is a sweet pastry crust intended for desserts. It has a delicate crumb much like shortbread but is absolutely delightful paired with custards, fruits, and chocolate.
What is the Difference Between Pie Crust and Tart Crust?
Traditional pie crust typically has less butter and sugar than a tart crust and is rolled out in a thin layer or two to accompany pies and be filled. Pie crust tends to be versatile for many uses but also has the tendency to be overworked and tough if not careful. Tart crust also uses egg yolks as part of it’s moisture which gives it a more delicate crumb, but still allows for a crust that can be rolled or pressed into a tart pan. This creates a thicker edge and provides a beautiful crust to fill with your desired dessert filling. Tart crust resembles more of a shortbread cookie base rather than a thin pastry lining like a pie crust does.
Ingredient Notes
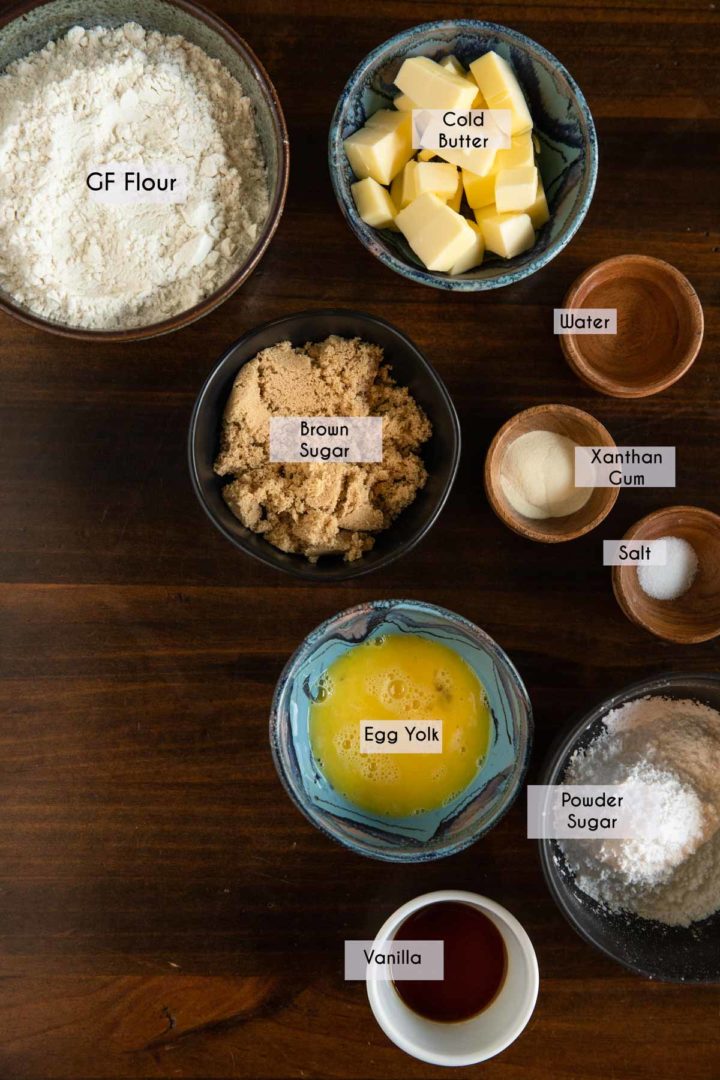
Gluten Free Flour
My favorite brand of gluten free flour for general purpose baking is “Bob’s Red Mill Gluten Free 1 to 1 Baking Flour”. Other brands of gluten free flour should work fine as long as they are a similar rice based flour.
Measuring gluten free flour varies vastly with each brand. I find a kitchen scale to be invaluable with gluten free baking. If you don’t have a kitchen scale, then measure your flour by first fluffing the flour with a fork, then using a spoon to gently scoop the flour into your measuring cup. Lastly, use the flat side of a knife to level off your measuring cup. Repeat with any remaining scoops you need.
If you use a different brand of flour, check the moisture content of the dough before you add the water to see if it is already soft enough. If it is too dry then add water 1 teaspoon at a time until a soft, crumbly but pressable dough is achieved.
If it is a warm day consider putting your flour into the freezer to chill it before beginning the recipe so the butter stays firm as long as possible.
Butter
It won’t make a huge difference if you use salted or unsalted butter for this recipe, however you want to make sure your butter is very cold to start out. If it is a warm day then after you cube the butter put it back in the fridge for 5 minutes to re-firm before using.
Sugar Varieties
Since this is a gluten free pâte sucrée recipe, the addition of confectioners or powdered sugar helps it maintain a tender shortbread type crumb. The addition of a bit of brown sugar helped keep this gluten free version less fragile without compromising flavor.
Xanthan Gum
Gluten free baked goods tend to be more fragile or crumbly that their glutenous counterparts. As such, xanthan gum is immensely helpful in helping with the structure of gluten free baked goods. Even if your flour blend has xanthan gum in it, you will still need to add additional for the tart crust.
Egg Yolks
Obviously egg yolks can vary in size, so depending on the size of your eggs or the humidity of the weather you may need more moisture than the recipe calls for. You can add additional cold water, just 1 teaspoon at a time until the dough is a able to form into soft clumps that can be pressed together.
Step By Step
Since we don’t need to be as gentle with gluten free dough, pie and tart crust dough is easiest to just make in a food processor. Since not everyone uses a food processor you can find the “by hand” method listed as well for your convenience, though a hand mixer is also ideal for making this crust.
Food processor Method:
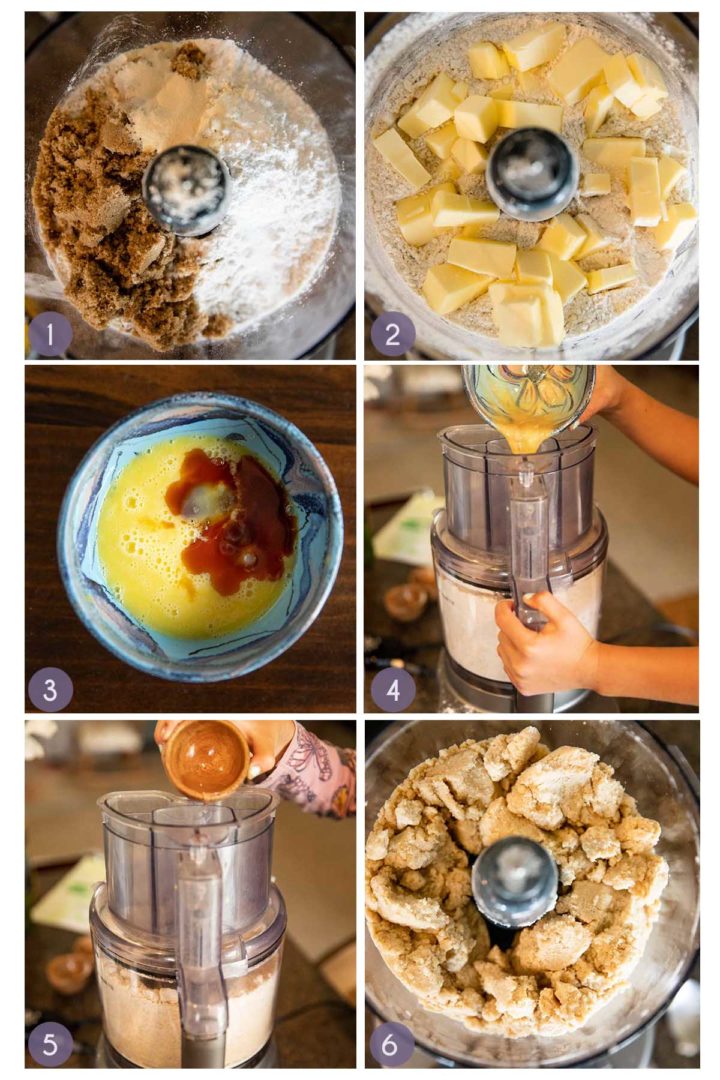
- Combine your flour, salt, xanthan gum, and both sugars in the bowl of the food processor and pulse to combine.
- Sprinkle the cold butter cubes over top, then pulse until just coarse crumbs remain. About 15-20 Pulses.
- In a small bowl, whisk together the egg yolks and vanilla.
- Slowly pour the eg yolk mixture into the flour mixture while the food processor is running.
- Lastly add the water to the running food processor, 1 teaspoon at a time.
- The dough should come together in clumps and can gently be pressed into a ball but is not gooey. If more cold water is needed, then add it 1 teaspoon at a time.
By Hand Method (or use a hand mixer if you one)
- Combine flour salt, xanthan gum, and both sugars in a large bowl and whisk to combine.
- Sprinkle the cold butter cubes over the flour mixture and, using your fingertips or a pastry blender, press and crumble the butter and flour together until just small crumbles of butter remain.
- Whisk together the egg yolk and vanilla in a small bowl and pour it over the butter and flour mixture.
- Use a fork to work the egg yolks into the flour mixture and add the cold water, 1 teaspoon at a time, until the dough is just able to hold together and all the flour mixture is combined.
- add 1-2 teaspoons of additional cold water if needed.
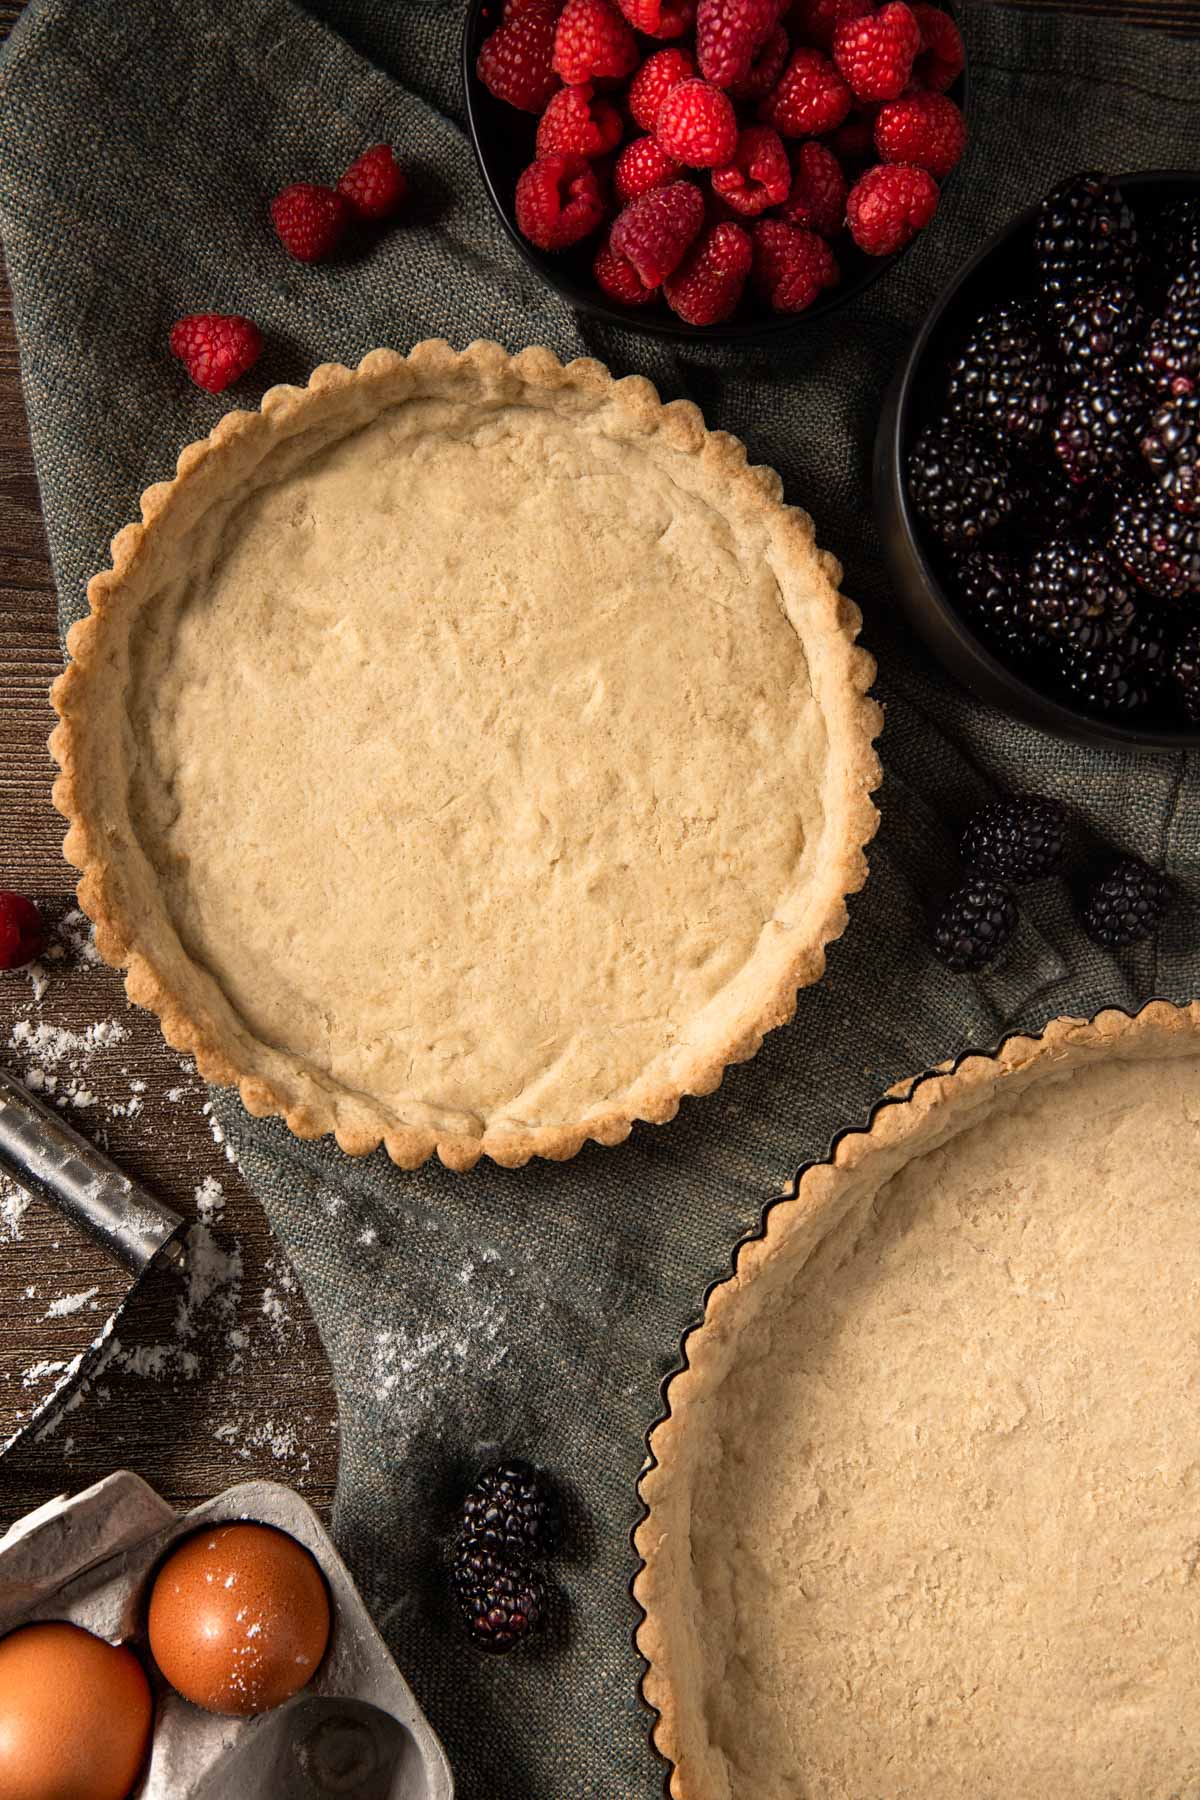
Tart Crust Assembly
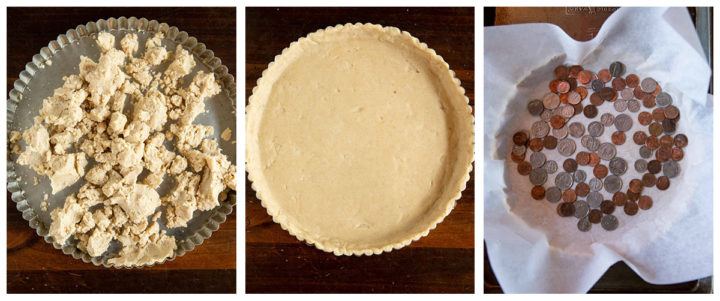
- Since the tart crust is so fragile to work with, simply dump the dough out into your tart pan and press it into the pan, starting with the sides. If you want to smooth the dough out further, then line with a layer of plastic wrap and use the flat bottom of a measuring cup to smooth any fingerprints out of the tart shell. This is purely for aesthetics, as your filling of choice will cover any fingerprints as well.
- Chill the prepared crust in the freezer for 15 minutes to firm up the softened butter before baking.
How to Par-Bake(blindbaking) or Fully Bake Your Tart Shell
- Preheat the oven to 375° F
- Remove the tart shell from the freezer and place the tart pan on a baking sheet for an additional layer of insulation on the bottom.
- Lightly grease a square of parchment or tinfoil and place it inside the tart shell and line the foil or parchment with pie weights.
I still haven’t bought pie weights, but I find using loose coins or pennies works wonderfully in place of pie weights!
Using pie weights keeps the crust from developing air bubbles that rise up as it bakes
- Bake the tart crust for 15 minutes then remove the layer of parchment/foil and the pie weights. If your recipe calls for a par-baked or blind-baked shell then just cook an additional 5-10 minutes until just barely beginning to brown.
- To fully bake your shell, place the shell back into the oven without the pie weights and lining and bake an additional 10-20 minutes until golden all around the edge and just lightly browning in spots on the bottom.
- Remove from the oven and let cool to room temperature before filling.
Storage
This gluten free tart crust can be made up to 1 day ahead of time and be stored covered in plastic wrap at room temperature until ready to fill.
Freezing
The tart dough can be made ahead of time and frozen in a flat 6” disc wrapped in plastic wrap for up to one month. Thaw the dough before pressing it into your tart pan, but work with it still cold. Re-chill in the freezer for just 15 minutes after pressing into the pan to firm up the butter before baking.
Recipe FAQ’S
This recipe will work for up to an 11” tart pan. You can divide it up for smaller pans if you would like though, or freeze any unused dough.
Pate sucree is a sweet shotrbread pastry crust that is rich and delicate. It lends itself wonderfully to dessert tarts. Pate Brisee more closely resembles pie dough as it uses just a bit of granulated sugar and uses no egg yolks. It can be used interchangeably for both sweet and savory tarts.
The 3 types of french pastry dough are Pâte Sucrée, Pâte Brisée, and Pâte Sablée. The difference is in their level of sweetness and crumb texture. This article about the difference between the 3 different pastry dough’s explains it very well.
Filling Ideas
This gluten free sweet pastry crust is perfect for most dessert fillings.
Try pairing your tart shell with custards or fruit, or swapping the pie crust from your pie recipe for this tart shell to make them into a showstopping tart!
Need More Recipe Inspiration? Try These Reader Favorites:
- Grandma’s Classic Lemon Meringue Pie
- Gluten Free Key Lime Pie
- Ultimate Gluten Free Pie Crust
- Gluten Free Strawberry Rhubarb Pie
Did you make this recipe? It would be wonderful if you could leave me a comment with what you thought of it, and a ⭐️⭐️⭐️⭐️⭐️ rating below!
Gluten Free Tart Shell
This gluten free tart shell is the perfect way to class up any pie or tart recipe and make your dessert a showstopper in an effortless way! You can make the shell ahead of time to have ready when needed and the recipe includes both unbaked and pre-baked options to go with your dessert.
Ingredients
- 10 ounces (2C. + 3TBSP) Gluten Free Flour Blend*
- 1 1/4 teaspoons Xanthan Gum*
- 1/4 teaspoon Salt
- 1/4 Cup Powder Sugar
- 1/4 Cup Brown Sugar
- 10 Tablespoons Cold Butter, Cubed
- 2 Egg Yolks
- 1 teaspoon Vanilla
- 2-3 teaspoons Cold Water*
Instructions
- In the work bowl of a food processor, combine flour, xanthan gum, salt, and both kinds of sugars.
- Pulse 2-3 times until dry ingredients are mixed.
- Scatter the cold butter cubes over the dry ingredients and pulse until butter is broken down into small crumbs, about 5-10 pulses.
- Whisk together egg yolk and vanilla in a small bowl.
- With the food processor running, slowly pour in the egg yolk mixture and mix until the dough just begins to come together around the blade.
- If the dough is too dry still, then add the water while the food processor is running and mix until the dough comes together. Add just the amount of water you need to bring it together, 1 teaspoon at a time.
- Dump the dough out into a 10-11" tart pan and, using your hands, press the dough into the pan.
- If you want to smooth the dough out more, then you can place a sheet of parchment on top and smooth and press the dough lightly with the bottom of a measuring cup.
- Place prepared dough in the fridge until ready to use, or chill in the freezer for 15 minutes before pre-baking.
To Pre-Bake (blindbake) The Tart Shell:
- Preheat oven to 375° F
- Once the shell has been chilled, place the tart pan on a baking sheet and line the inside of the tart shell with a piece of greased parchment or tin foil.
- Scatter pie weights (or coins) on top of the parchment to weigh it down. This will prevent the tart from getting air bubbles as it bakes.
- Bake for 15 minutes, rotating the pan half way through baking.
- After 15 minutes then lift off the parchment and pie weights. For a par-baked shell then just bake an additional 5-10 minutes at this point until barely beginning to brown, then let cool to room temperature before using in your recipe.
- To fully pre-bake the shell, then after the parchment and pie weights are removed, place the shell back in the oven for another 10-20 more minutes until golden brown around the edges.
- Remove from the oven and let cool to room temperature before filling.
- Store with the tart ring on and remove it right before serving.
By Hand Method(use a hand mixer if available):
- Combine flour, xanthan, salt, powder sugar, and brown sugar in a large bowl. Whisk to Combine
- Scatter cold butter on top of the flour and, using a pastry blender or your hands, press the butter into the flour until just small crumbs remain.
- Whisk together the egg yolk and vanilla in a small bowl and pour it over the butter and flour mixture.
- Use a fork or your hands to incorporate the egg yolk until the dough just begins to come together.
- Add 2 teaspoons of the water and mix until the dough is no longer crumbly and able to be pressed together, If needed then add an additional 1-2 teaspoons of water.
- The dough should be able to hold its shape when pressed together but not a sticky ball of dough.
- proceed as directed above, for pressing the tart shell into the pan and baking.
Notes
*I use "Bob's Red Mill 1 to 1 Baking Blend" which works perfectly for this recipe. If you don't have a kitchen scale, then measure your flour by first stirring the flour with a fork to fluff it up, then gently scoop the flour into your measuring cup using a spoon. Lastly scrape the top of your measuring cup off with the flat side of a knife to level it off. Repeat with any additional scoops needed.
* Xanthan gum is very helpful in the structure of gluten free pastries, do not omit it in this recipe or the tart shell will be very crumbly.
*Egg yolks vary in size so you may need slightly more or less water depending on the size of your eggs or how dry the weather is. Add your water 1 teaspoon at a time until the dough just comes together and holds its shape when pressed.
Nutrition Information:
Yield:
10Serving Size:
1Amount Per Serving: Calories: 255Total Fat: 13gSaturated Fat: 8gTrans Fat: 0gUnsaturated Fat: 4gCholesterol: 67mgSodium: 148mgCarbohydrates: 32gFiber: 1gSugar: 10gProtein: 4g
*Nutrition information is automatically calculated and may not always be accurate.