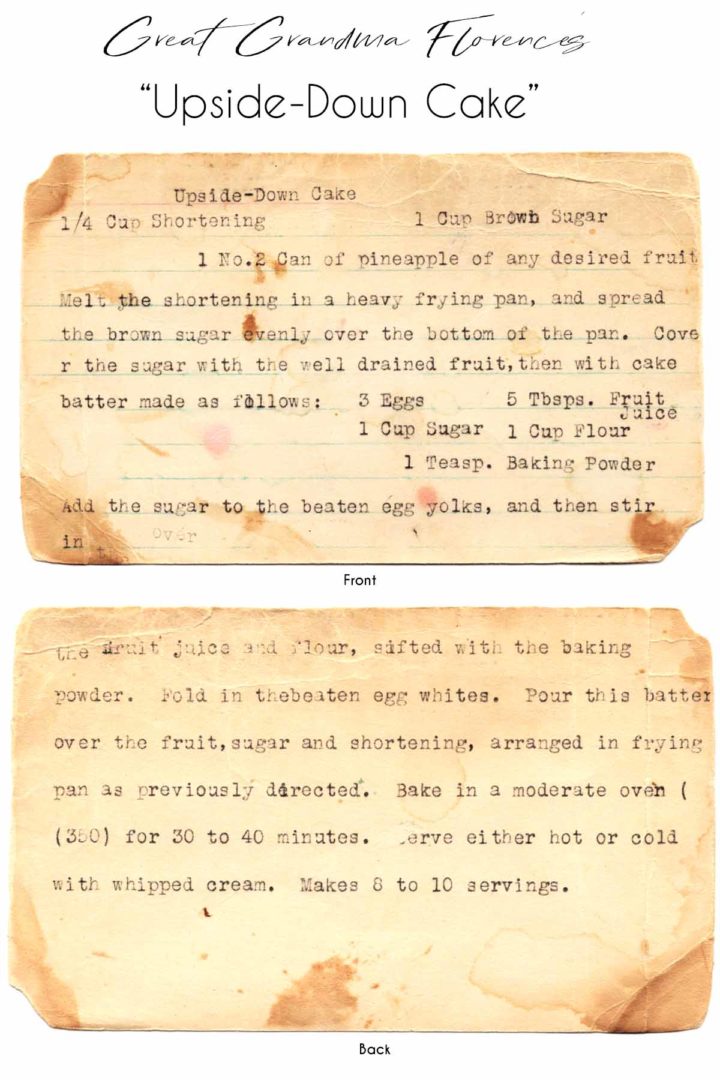
Old Fashioned Pineapple Upside Down Cake

Old Fashioned Pineapple Upside Down Cake is a classic recipe that has stuck around because simply put, it’s damn delicious! Baked in a cast iron skillet with a heavenly caramel topping and fruity pineapple rings, there is a reason this recipe has stuck around for so long.
Buried in all my recipes are a few old recipe cards that have been passed down from grandparents over the years. Peeking out from the back of the pile is a yellowed, splattered, and clearly well-loved recipe, labeled “Upside Down Cake”. Here is where my inspiration is born…
Why Was Pineapple Upside-Down Cake Invented? A Brief History of Upside Down Cake
Though fruit and cake have been complimenting each other down the ages, pineapple upside down cake seems to have peaked and become popular during the 1920’s. Cast iron cookware was the norm and a common household item for most homes. It was only logical to create a stunning cake with minimal effort, that could be baked and decorated all in one pan! From old recipe cards and cookbooks to the back of pineapple cans, you will find this recipe showing up all over during the 1920’s. The spark of attention it received in 1925 when the Dole pineapple company (then called the Hawaiian Pineapple Company) announced a competition using canned pineapple, really brought this vintage beauty the popularity it deserved!
Ingredients
The ingredients for this cast iron pineapple upside down cake are basic and beautiful, each one working together to play its’ part. My recipe has been adapted to be a gluten free, dairy free pineapple upside down cake. You can make this a traditional variation as well by using butter and regular milk in place of the almond milk and oils, or just by following the vintage recipe that is attached.
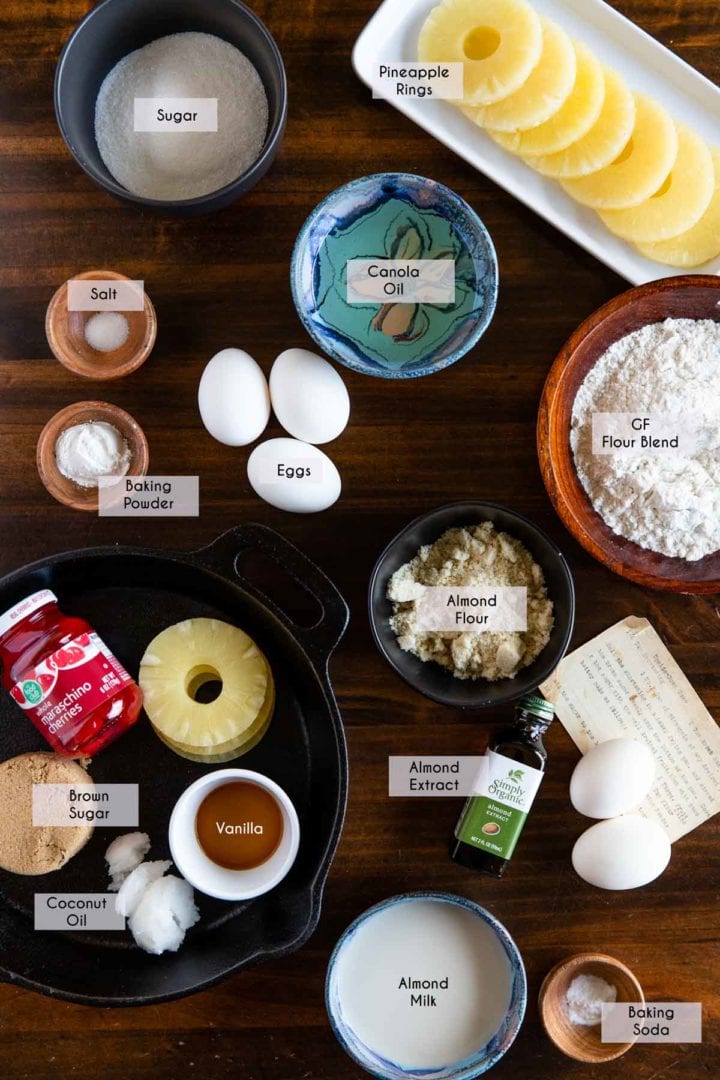
Pineapple Rings
Canned pineapple is traditional for cast iron pineapple upside down cakes, but if you want to core and slice fresh pineapple (1/4″ thick slices) that will work just as well!
Gluten Free Flour Blend
To keep this pineapple upside down cake gluten free, this recipe was developed using Bob’s Red Mill 1 to 1 Baking Blend, which includes xanthan gum. If you use a different flour blend, then I recommend using a blend that has rice flour as its first ingredient and includes xanthan gum. If your blend does not include xanthan, then add ¼ teaspoon to the dry ingredients to help with the structure of the cake.
Every brand of gluten free flour varies, and scooping straight from the bag leads to inconsistent results and packs the flour down when measuring. Weighing the flour is immensely helpful for baking, but if you don’t have a kitchen scale then fluff your flour with a fork first, then gently scoop it into the measuring cup with a spoon. Lastly, level off your measuring cup with the back edge of a knife. If you do this every time ,then the results are consistent with the weight of flour listed in most gluten free recipes.
Almond Flour
Though this recipe only has a small amount of almond flour, it lends a lovely nutty component that is accompanied by the almond extract. This can be omitted if you don’t have it and substitute 2 additional Tablespoons of gluten free flour in its place.
Eggs
Old fashioned pineapple upside down cake is a chiffon cake, which means that it separates the eggs to get its airy sponge texture from egg whites.
The egg yolks get beaten in with the sugar and rest of ingredients, then you whip the egg whites to form soft peaks, and gently fold them into the cake batter at the end. This is a key component to what makes pineapple upside down cake unique and have that perfect texture!
Step By Step:
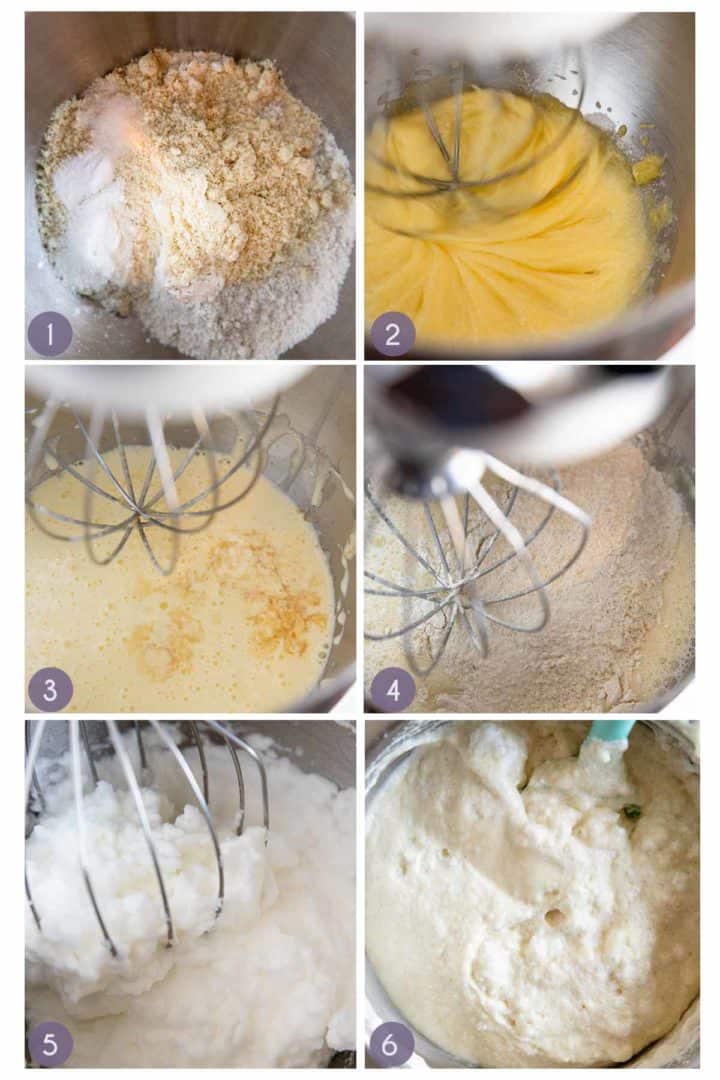
- Combine dry ingredients in a small bowl
- Beat egg yolks and sugar together
- Add milk, oil and extracts to egg mixture and whisk
- Add in flour blend and mix until smooth.
- Whisk egg whites until soft peaks form
- Gently fold egg whites into cake batter by hand.
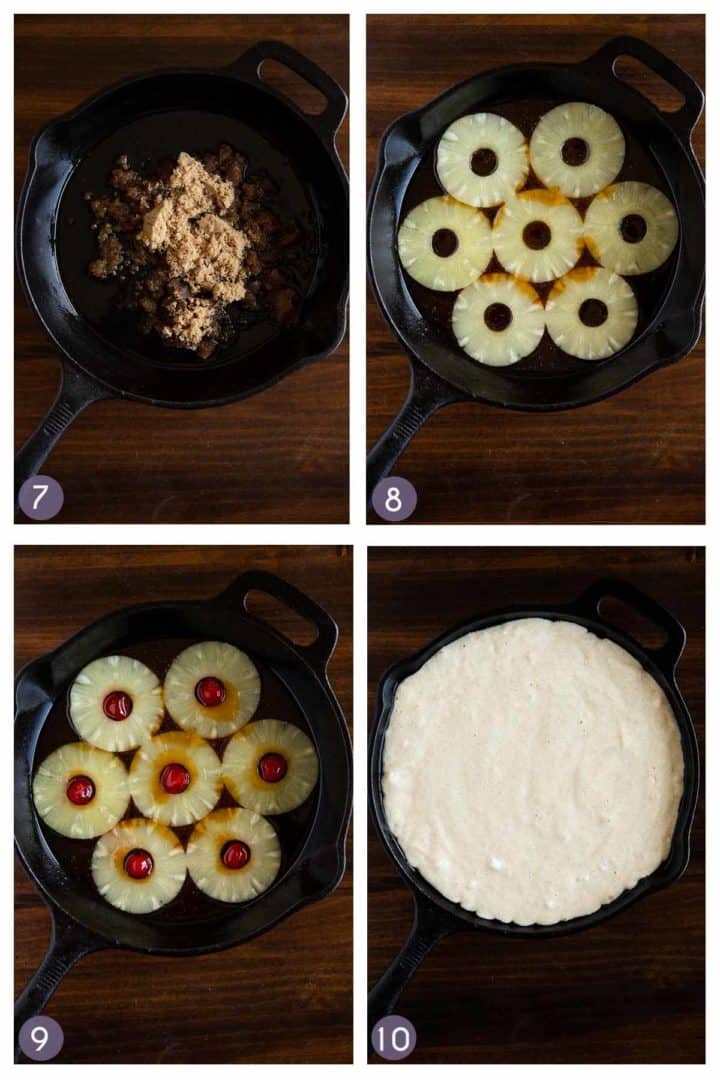
- Prepare pan with caramel topping
- Add cake batter and bake
- Let cool slightly, then invert cake onto plate!
Which Pan Should You Use For Pineapple Upside Down Cake
Traditionally, upside down cakes are made in a cast iron skillet. Using a cast iron skillet means the topping can be prepared right in the pan, and there is no need to grease or line a cast iron skillet for upside down cakes.
If you don’t have a cast iron skillet, then this recipe can be made in 2-8” round pans or a 9×13 baking dish or cake pan as well.
When using cake pans for upside down cake, you will want to grease the sides of the pan only. If you have a pan that tends to stick, you can line the bottom with parchment paper cut to the size of the inside to lay flat on the bottom of the pan, but this usually isn’t necessary.
If not using a cast iron skillet, then just microwave your brown sugar topping for a few seconds to mix it with your butter or oil, instead of heating it directly over the stove-top.
Do not use a springform pan for upside down cakes! I made this mistake and had an intense smoky oven as the oil from the topping leaked through the crack at the base while cooking and burned in the oven. If you end up using one, then set the springform pan on a parchment lined baking sheet first to catch and keep drips from burning!
How To Flip a Pineapple Upside-Down Cake Out Of It’s Pan
The beauty in pineapple upside down cake is flipping it out of the pan and having a gorgeous fruit decorated cake that was made all in one pan!
You do not want to cool the upside down cake fully, but just let it set and firm up a few minutes. This gluten free pineapple upside down cake is ready to flip after just 10 minutes of cooling.
To Flip It Out Of The Pan:
- place a large serving platter upside down on top of the skillet or baking dish.
- Using pot holders, place one hand under the baking dish, and the other pressed firmly on the back of the serving platter to hold them tightly together.
- Quickly invert the skillet or baking dish upside down, releasing the cake onto the serving platterLet the cake finish cooling on the platter before serving
Storage:
This gluten free pineapple upside down cake can be stored at room temperature for up to 48 hours. If you have leftovers longer than that, you will want to refrigerate the pineapple upside-down cake as the fruit and grain combo will begin to ferment if left at room temperature longer than 48 hours.
To Freeze Pineapple Upside Down Cake
Pineapple upside down cake can be frozen if desired, though after thawing the fruit side my be a bit softer than when eaten fresh.
After the pineapple upside down cake has been turned out onto a platter, and has cooled to room temperature, freeze the upside down cake uncovered on its platter. After the cake is frozen, then remove it from the platter and wrap thoroughly in 2 layers of plastic wrap and stir in the freezer for up to 3 months.
Thawing The Frozen Cake
To defrost or thaw the cake, simply remove from the freezer, unwrap the cake while still frozen and set it on a platter. Let the cake thaw uncovered on the platter until it has softened and reached room temperature. After the cake is thawed you can lightly warm in the oven if desired.
Serving Ideas
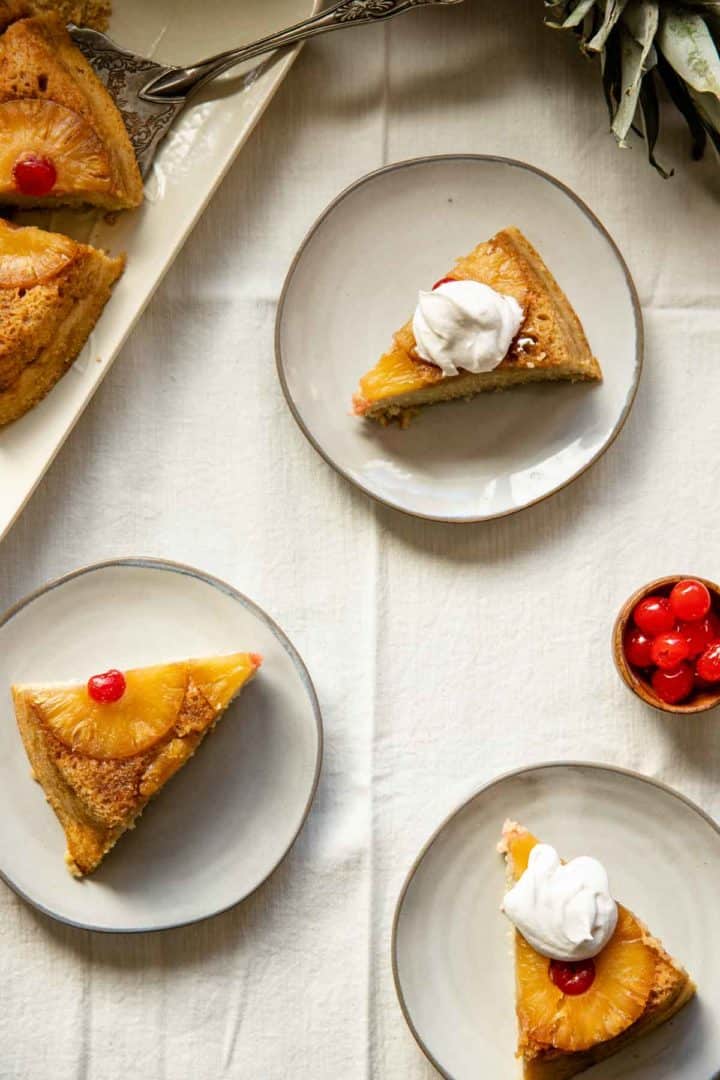
We love to keep with the tropical theme and serve pineapple upside down cake with a dairy free whipped coconut cream! You can also top it with regular whipped cream if you prefer (see recipe card notes for how to make this)!
Pineapple upside down cake is great a paired with a summer barbecue type menu, or make it as a dessert that accompanies these delicious Gluten Free Enchiladas!
Love Fruit Desserts? You Might Enjoy These Other Gluten Free Fruit Desserts:
- Gluten Free Strawberry Rhubarb Pie
- Gluten Free Key Lime Pie
- Grandma’s Classic Lemon Meringue Pie
- Pear Cheesecake with Ginger Spice
Old Fashioned Pineapple Upside Down Cake
Old Fashioned Pineapple Upside Down Cake is a classic recipe that has stuck around because simply put, it’s damn delicious! Baked in a cast iron skillet with a heavenly caramel topping and fruity pineapple rings, there is a reason this recipe has stuck around for so long. This pineapple upside down skillet cake is gluten free and dairy free making it a great please everyone recipe!
Ingredients
- 3 Tablespoons Coconut Oil
- 1/2 Cup Brown Sugar
- 1 Can of Pineapple Rings (7 Rings)
- 7 Maraschino Cherries
- 1 1/2 Cups Gluten Free Flour Blend (see note)
- 6 Tablespoons Almond Flour
- 2 teaspoons Baking Powder
- 1/4 teaspoon Baking Soda
- 1/4 teaspoon Salt
- 5 Large Eggs, Separated
- 1/2 Cup Sugar
- 1/2 Cup Vegetable Oil
- 3/4 Cup Almond Milk
- 1 teaspoon Vanilla
- 1 teaspoon Almond Extract
Instructions
- Heat oven to 350° F.
- In s small bowl, mix together the flour blend, almond flour, baking powder, baking soda, and salt. Set aside.
- In a large mixer bowl, combine the egg yolks and sugar. Beat with a mixer, until color begins to pale and slightly fluffy, about 1 minute.
- Add the oil, milk, and extracts to the egg yolks and beat until well combined.
- Dump in the flour mixture and mix thoroughly for another 1 minute.
- In a clean mixing bowl, beat the egg whites with a mixer on medium speed, using a whisk attachment, until fluffy and soft peaks form.
- Using a rubber spatula, gently fold the soft egg whites into the cake batter mixture. Be careful to not beat the egg white's in but gently fold and stir by hand.
- Place a 9-10" cast iron skillet, over medium heat on the stove and melt the coconut oil in the skillet.
- Once the oil is melted then add the brown sugar. Stir to combine and remove from heat.
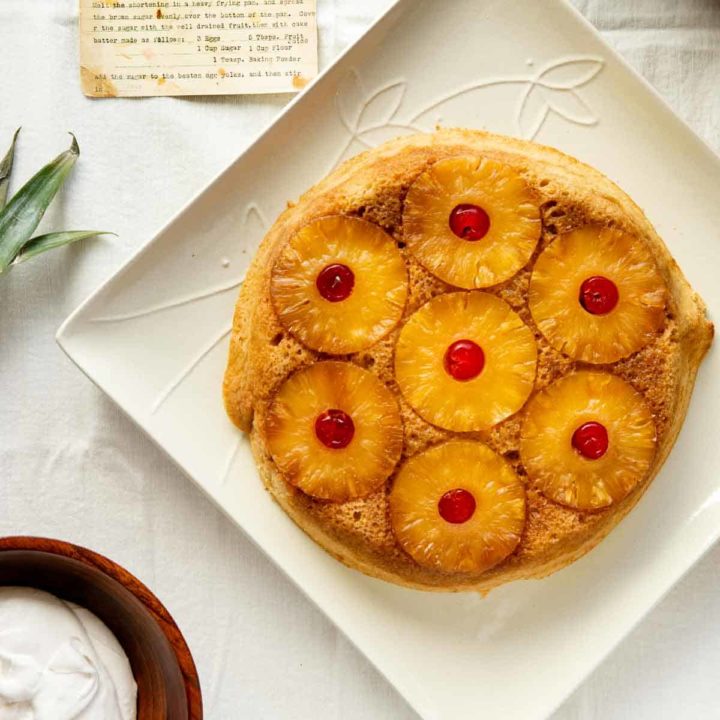
- Layer 7 pineapple rings around the pan, on top of the brown sugar mixture, with one pineapple ring in the center. Then, place 1 cherry inside the hole of each pineapple ring.
- Pour cake batter into the skillet.
- Bake in the pre-heated oven for 35-40 minutes, until a toothpick inserted in the center comes out with just a few crumbs but no gooey batter.
- Remove the cake from the oven and let cool only 10 minutes.
- To remove the cake from the pan: place a large serving platter upside down on top of the skillet. Using pot holders, place one hand under the skillet and one hand on top of the inverted plate to hold them tightly together. While holding them tightly together, flip the skillet upside down so the cake comes out onto the serving platter.
- Let the cake continue to cool at room temperature. Then slice and serve with whipped coconut cream (see note) or whipped cream of choice!
Notes
Gluten Free Flour Blend: I use Bob's Red Mill 1 to 1 Baking Blend, which includes xanthan gum. For this recipe I recommend a rice flour based blend and if your blend does not include xanthan, then add 1/4 teaspoon to the recipe.
Measuring your Gluten Free Flour: Gluten free flour varies by brand, so measuring by weight is extremely helpful in gluten free baking. If you don't have a kitchen scale, then fluff your flour well with a fork and spoon the flour gently into your measuring cup. Lastly scrape the top level with a knife. Do not just scoop into the bag, as this will pack your flour down and provide you with inconsistent results!
To Make Whipped Coconut Cream for a Dairy Free Whipped Cream: Chill a can of good quality coconut milk, ( I use Thai Kitchen Organic Coconut Milk, which I have found provides the most amount of thick milk to whip) and chill at least 4 hours or preferably overnight. Open the chilled can and scoop off only the solid creamy top, leaving behind the thin water. Mix the coconut cream with a mixer, using a whisk attachment, on medium high speed for about 1 minute until it begins to soften and incorporate some air. Slowly add 1/4 Cup of powdered sugar and 1 teaspoon of vanilla. Whisk for another minute or two, continuing to incorporating air. Serve or chill until needed! (chilling will continue to thicken it, but not necessary.)
Original Variation: See blog post for how to make this in traditional non-gluten free form, or follow the vintage recipe card shared in the blog post.
Nutrition Information:
Yield:
10Serving Size:
1Amount Per Serving: Calories: 341Total Fat: 20gSaturated Fat: 5gTrans Fat: 0gUnsaturated Fat: 13gCholesterol: 93mgSodium: 92mgCarbohydrates: 35gFiber: 1gSugar: 20gProtein: 6g
*Nutrition information is automatically calculated and may not always be accurate.
Sweet! ( literally ) and so yummy! Definitely brought a tear to my eye to see my Grandma’s old familiar recipe card… Grandma Florence especially loved to bake it in the summers ST her old cabin along the river…
Warm… melting with just a touch of whipped cream; one small slice always seemed too small! ❤️
The perfect location for a cup of coffee and a slice of cake!
I would so love a slice of this for a mid morning snack – sounds and looks delicious!
perfect with afternoon coffee 😋
Such a classic cake….I am glad I came across such a detailed recipe with tips! This is exactly the recipe I’ve been looking for
I’m glad you find it helpful!
I never knew how this cake was invented. Thank you for that. I will definitely be making this fantastic pineapple upside down cake soon.
I love the history behind recipes 😊
My family loves upside down pineapple cake and I have never made it at home. Can’t wait to try your recipe. You explained it so well
Thanks
It’s surprisingly simple, and a favorite in our home! 😋