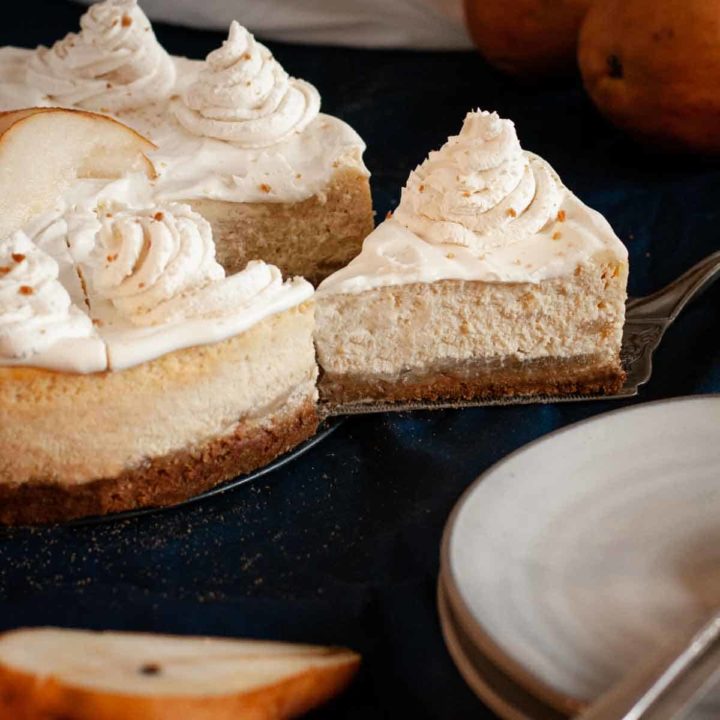
Pear Cheesecake with Ginger Spice
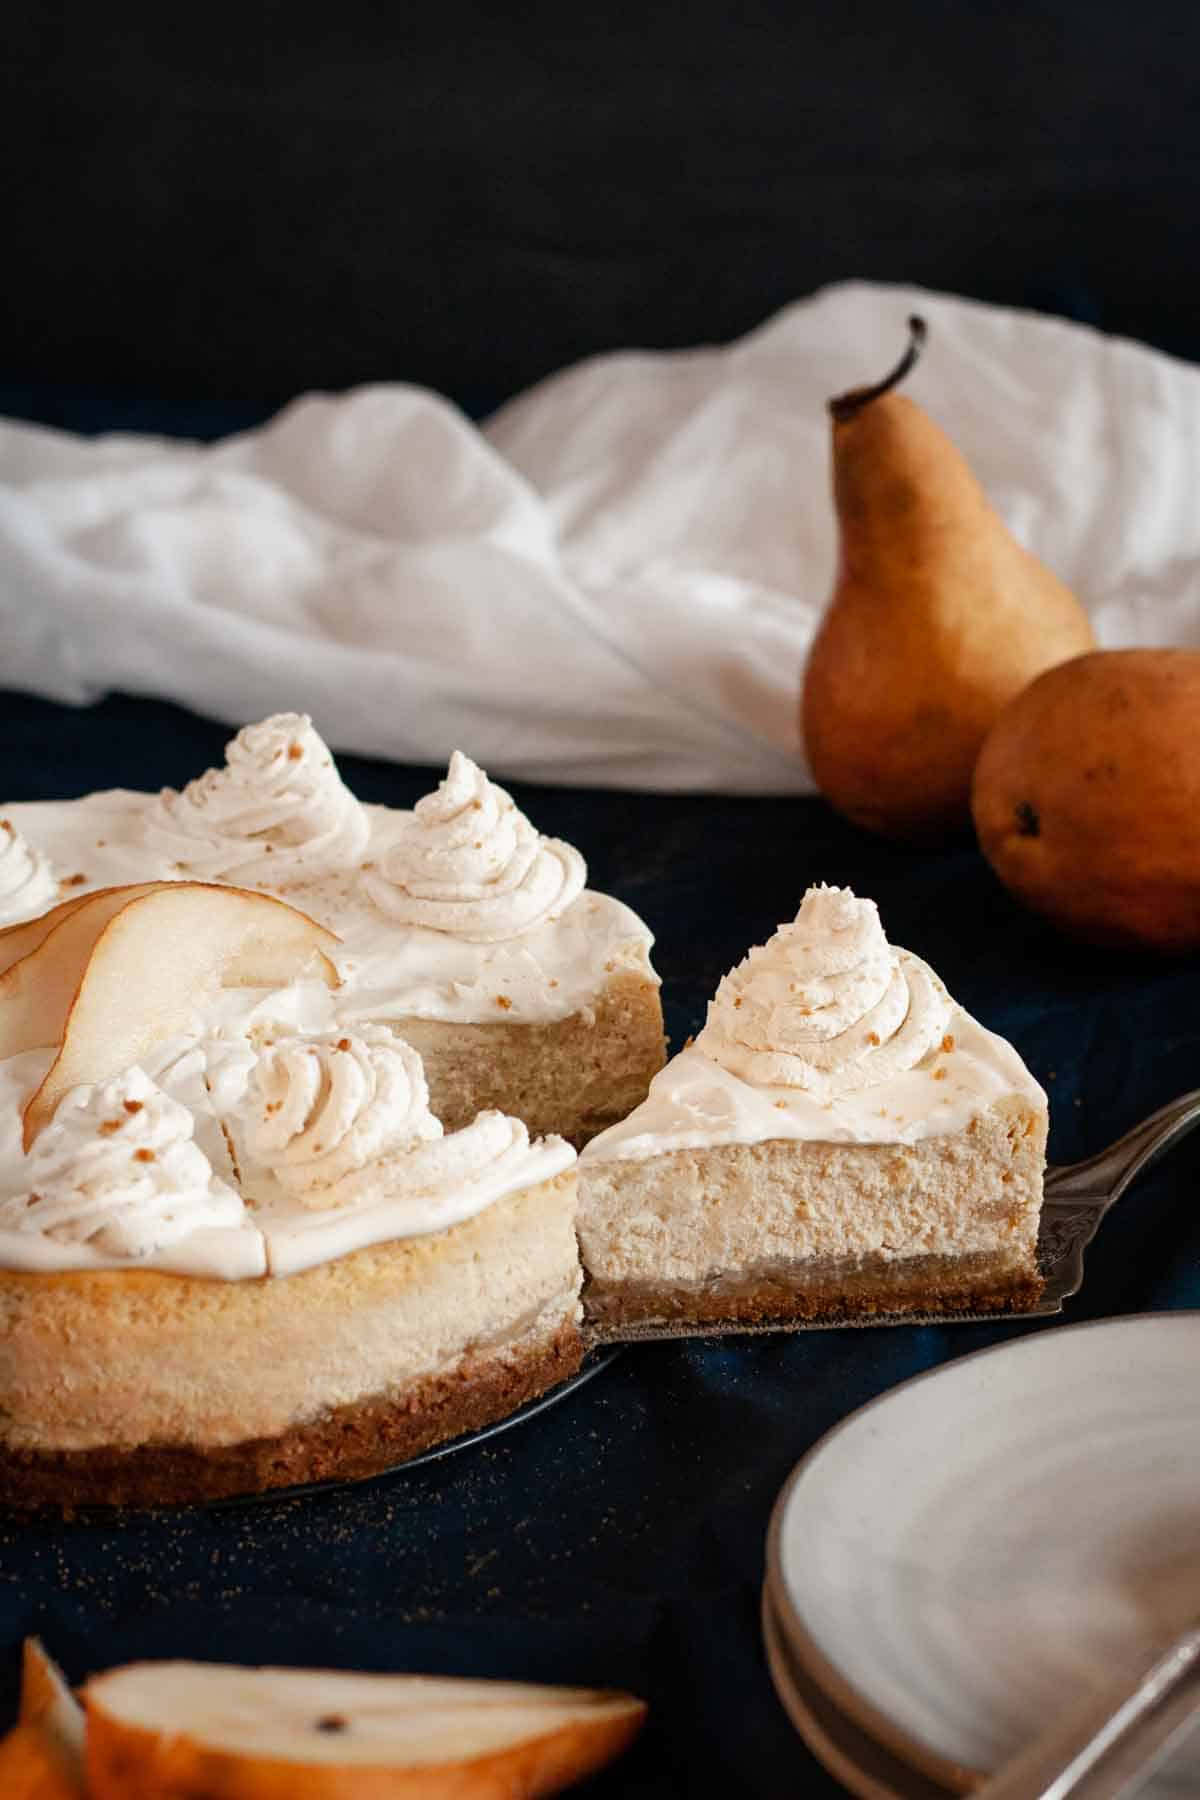
Pear cheesecake with ginger spice is a holiday favorite in our home, whether it be a contribution to Thanksgiving, Christmas or New Years!
I have many variations of baked cheesecake recipes that I love to make, but this time of year the winner is always my spiced pear cheesecake with ginger. Pears are bountiful this time of year and I love to take advantage of seasonal produce whenever I can. The layer of poached pear adds a nice contrast in texture to the creamy smooth cheesecake, and the ginger spice helps meld the flavors into a uniform dish.
Creamy and smooth, I’ve always been a sucker for a good cheesecake. As a kid, on the rare occasion that we were allowed to order dessert, cheesecake was always my favorite. Once I got into high-school I discovered there was a decent market for baked cheesecakes in my hometown, and it was a fun way to fuel my love of baking and earn some extra cash as well!
How to Make Baked Cheesecake:
Contrary to what many people believe, cheesecake is surprisingly simple to make.
The key to baked cheesecake is low oven temperature (300°F) and allowing the cake to slowly cool without jiggling it.
The cheesecake is finished cooking when it is still a bit jiggly in the center but firm around the edges (this takes about 60 minutes for a 9” cheesecake). A slightly underdone cheesecake is better than an over-baked dry cheesecake! Once the cake has finished baking, shut the oven off and crack the oven door but leave the cheesecake in the oven to slowly cool. Once the oven has mostly cooled off, then the cheesecake can be removed from the oven to finish cooling to room temperature. Do not put the cheesecake in the fridge until it has reached room temperature (or close to). If the cheesecake is chilled too rapidly it will cause the cake to sink and crack.
Graham Cracker Crust:
The crust for this recipe is as simple as just making a basic graham cracker crust using crushed crackers & melted butter. I use my blender to crush the crackers, but if you don’t have a blender you can pound the crackers with a rolling pin, in a sealed Ziploc bag, until finely crushed. For this recipe I add ginger spice right into the crust for an additional burst of flavor. Another option, is to make this a pear cheesecake with gingersnap crust by crushing gingersnaps instead of graham crackers. If you do this, then omit the extra ginger in the crust.
Trouble Shooting Cheesecake
For cheesecake there is no need to grease your springform pan as you would for traditional cake. Once the cake has cooled, unlatching the pan will allow it to slide off nicely from the cheesecake. If you notice any resistance, then just re-latch the pan before proceeding and run a smooth knife along the edges before unlatching. That’s it!
If your cheesecake cracks, then know that it does not affect the overall flavor and texture unless you severely overbaked it. When I have this problem (typically kids running around causing it to jiggle too much as it cools), then the great thing about the sour cream topping is it also fills in any cracks, and gives the appearance of a perfect cheesecake anyways!

Gluten Free Baked Cheesecake
The filling for homemade cheesecake is naturally gluten free, making it super easy to just convert the crust to gluten free and make this a favorite for everyone! If you want to make this recipe gluten free like I do, then just use gluten free graham crackers in place of regular ones. An 8oz box works perfectly. The brand typically carried in my grocery store is Kinnikinnick which I love, otherwise I order some Pamela’s brand ones with my monthly Thrive order.
Making Cheesecake Ahead and Freezing:
Any cheesecake is best after it has sat for a day or two, so this is the perfect make ahead dessert! If you want to make cheesecake more than a few days in advance, then cheesecake lends itself very well to freezing! To freeze a cheesecake just place the finished cheesecake on a cardboard circle and freeze 24hrs until firm. Once the cheesecake is frozen, then wrap it tightly, all around with 2 layers of plastic, and then a layer of foil to keep out any freezer burn. Freeze for up to one month. Thaw in the refrigerator for 24 hours when ready to use.
Enjoy!
Need More Dessert Inspiration? Here are Some Reader Favorites You Might Enjoy!
- Old Fashioned Pineapple Upside Down Cake
- Gluten Free Red Velvet Cupcakes
- Lemon Ricotta Filled Crepes
- How to Have a Gluten Free Thanksgiving: Your Ultimate Gluten Free Thanksgiving Recipe Guide
Pear Cheesecake with Ginger Spice
Pear cheesecake with ginger spice is naturally gluten free and bursting with flavor! This recipe Includes trouble-shooting, easy instructions for anyone and is the ideal gluten free holiday dessert that anyone can enjoy!
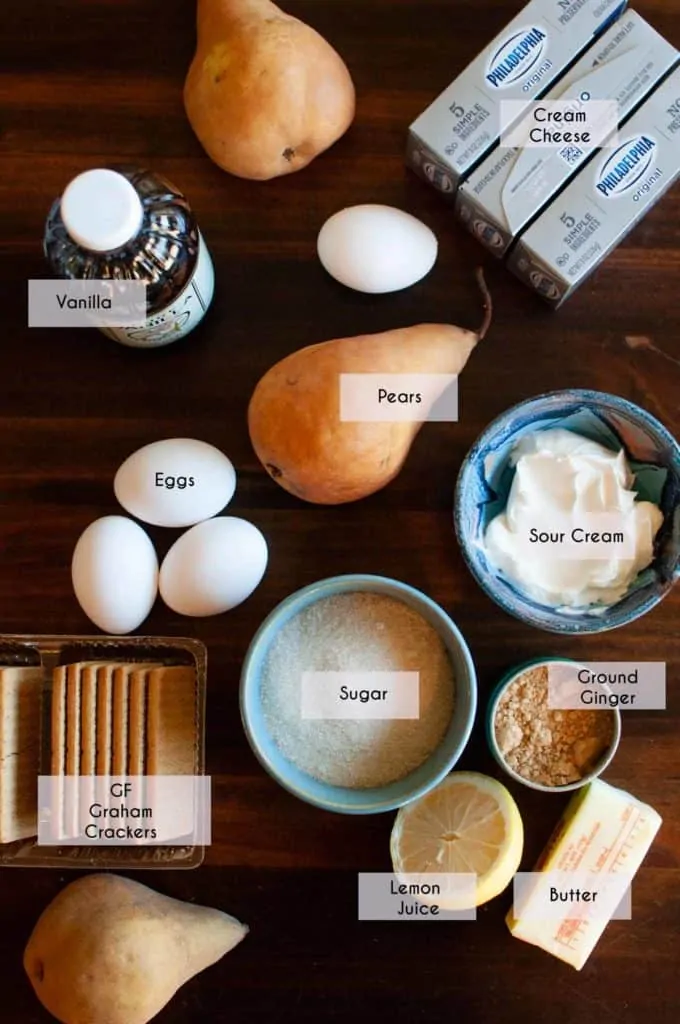
Ingredients
For the Crust:
- 8oz Package Graham Crackers* (Gluten Free If needed)
- 4 Tablespoons Butter, Melted
- 1 Tablespoon Ground Ginger
For the Poached Pear Layer:
- 3 Fresh Pears, Medium Ripe
- 1/4 C. Sugar
- 1 Tablespoon Lemon Juice
- 1/2 Cup Water
For the Cheesecake Filling:
- 3 -8oz Packages Cream Cheese, Softened
- 1 Cup Sugar
- 4 Eggs
- 1 teaspoon Vanilla
- 1/8 teaspoon Salt
- 2 Tablespoons Ground Ginger
- 1/2 Cup Sour Cream
Topping:
- 1 Cup Sour Cream
- 2 Tablespoons Sugar
- 1/2 teaspoon Vanilla
Instructions
- Preheat oven to 300° F with oven rack in middle position.
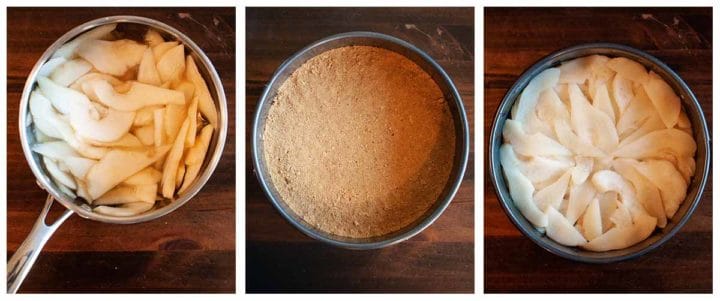
- prepare the crust by crushing the graham crackers in a blender or food processor. Add the melted butter and ginger, then mix to combine.
- Pat the crust mixture into the bottom of a 9 inch springform pan, tightly packing all the way around.
- Place crust in pre-heated oven and bake 10 minutes. Set aside to cool.
To poach the pears:
- peel the pears then slice them in quarters and core them. Thinly slice the quarters lengthwise into slices about 1/8-14 inch thick.
- Place the prepared pear slices into a medium saucepan with the sugar, lemon juice and water.
- Simmer over medium-low heat for about 8 minutes until the pear has softened and can be easily punctured with a fork but is not mushy. If the water begins to boil too strongly then turn the heat down to low.
- Gently transfer the pear slices to a colander and drain the liquid off.
Cheesecake Filling:
- Place the cream cheese and sugar in the work bowl of a stand mixer with paddle attachment and beat on medium just until smooth and combined. Scrape down the sides and bottom of the bowl.
- Mixing on medium speed, add the eggs one at a time, stopping to scrape down the bowl after each egg.
- Add in the vanilla, salt, ginger and sour cream. beat over medium speed one last time until well combined.
- Take the drained pears and layer them on top of the crust, all around in even layers.
- Pour the cheesecake batter over the pears, filling the springform pan about 1/2 inch form the top.
- Gently lift the filled pan and tap the bottom of the pan on the counter to remove any air bubbles.
- Place the cheesecake into the the oven and bake for 60-65 minutes until barely golden and the center is just jiggly but the edges have firmed a bit.
- Shut the oven off, but leave the cheesecake in the oven to slowly cool. Crack the oven door open to allow the oven to cool.
- Once the oven has cooled then you can gently lift the cheesecake onto the counter and let it finish cooling to room temperature.
- After the cheesecake has stabilized and reached room temperature then transfer it to the fridge to chill for at least 6 hours and up to 2 days.
Topping:
- combine the sour cream, sugar and vanilla in a small bowl and stir to combine.
- Spread the sour cream topping over the chilled cheesecake, smoothing over the surface and filling in any cracks that may have appeared.
- Gently run a knife around the outside edge of the cheesecake to make sure it is fully loosened from the sides of the springform pan, then gently unlatch the pan and lift the outer ring of the pan away.
- Cut the cheesecake into slices and serve with whipped cream if desired.
- Enjoy!
Notes
Cheesecake is best served a day or two after making it, and will keep in the fridge, covered, for up to 5 days. For longer term storage see blog post for notes on freezing cheesecake.
Nutrition Information:
Yield:
12Serving Size:
1Amount Per Serving: Calories: 515Total Fat: 33gSaturated Fat: 18gTrans Fat: 0gUnsaturated Fat: 11gCholesterol: 146mgSodium: 351mgCarbohydrates: 50gFiber: 2gSugar: 35gProtein: 8g
*Nutrition information is automatically calculated and may not always be accurate.

Mmmm! I got to sample this cheesecake and it was as good as it sounds! I think I shall have to spring for the gingersnap crust… ( perhaps a way to use up a leftover gingerbread house or two just in time for New Years?!? ) 🤫😉
That way BOTH gingerbread houses AND this yummy cheesecake could become tradition!!
Hi! This sounds great. Do you think instead of 3 -8oz Packages Cream Cheese (680 grams) I could use 500 grams cream cheese + 180 whipped cottage cheese? Thank you!
I imagine that should still work just fine though you might end up with a bit of a grainier texture. Would love to hear if it works out for you!